|
|
Remote Desktop Guide: Setup Client < [3/4] >
Table of Contents
Overview
After you have configured and set up a Remote Desktop server then you can use most any computer as the Remote Desktop client. The client will be the computer that remote controls the server.
Return to top.
Versions (of the Remote Desktop Connection client)
By default Windows XP comes with the Remote Desktop client so you do not need to install anything if the client is a Windows XP computer. However, for any other operating system you will need to install a client. The official clients are for Windows 95, Windows 98, Windows Me, Windows NT4, Windows 2000, Windows XP and Mac OS X 10.2.8 and above. There is also an open source client that runs on Linux.
Windows XP (release 1/2)
Microsoft Terminal Services Client (5.1.2600.1106)
This is the first release of the client and it came with the original release of Windows XP. I do not know why you would want it, but I have packed and hosted it so you can [download] it. However, I highly recommend you do not as the newer versions are much better.
Windows XP (release 2/2)
Microsoft Terminal Services Client (5.1.2600.2180)
This is the release of the client that came with Windows XP SP1 and above. So, if you have Windows XP then you do not need to download this, but you can [download] it for previous versions of Windows.
Windows Server 2003 (release 1/1)
Microsoft Terminal Services Client (5.2.3790.0)
This is the release of the client that came with Windows Server 2003. However, this version is slightly better than the version that came with Windows XP, and it works with Windows XP. So, you may want to run this version instead if your client computer is Windows XP. You can [download] it from Microsoft.
Mac OS X 10.2.8 (release 1/1)
Microsoft Remote Desktop Connection Client (1.0.3)
This is the Remote Desktop client software needed if you want to control a Windows Remote Desktop enabled computer with a Macintosh. You can [download] it from Microsoft.
Linux/Unix 1.4.1
rdesktop Open Source Remote Desktop Protocol Client
There is an open source Remote Desktop that will run on most any version of Unix or Linux. You can [download] it from its website. However, it is distributed as sourcecode so you will need to compile it yourself.
Return to top.
Client Connection
After you have set up a server to receive a connection then you can use a client to connect and to remote control that server. This section explains how to use the connection software.
1. Install the Remote Desktop Client
|
If you are running on Windows XP or Windows 2003 then this step is already done for you. If you are running Windows 95, Windows 98, Windows Me, Windows 2000 or Mac OS X then you will need to install the Remote Desktop client. In this case see the [versions] section to download the latest Remote Desktop client. |
2. Run Remote Desktop Client
|
The next step is to execute the Remote Desktop client.
If Remote Desktop came with your OS then it can be found in your Start Menu under [All] Programs \ Accessories \ Communications \ Remote Desktop Connection.
If you installed Remote Desktop then that will be placed in your Start Menu under [All] Programs \ Remote Desktop Connection. |
3. Computer Address
(click for larger image)
|
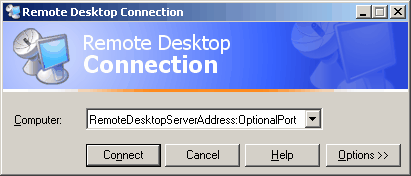
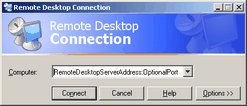
When you first run Remote Desktop it will look as it does to the left. In the "Computer:" text field you will need to enter the Internet address of the computer that you wish to connect to. This can be an [IP address], a [DNS Hostname address] or a NetBIOS name. You can use my [Host Look-up Utility] to quickly see what they are for the hosting computer (with the exception of your NetBIOS name, but if you don't know what that is then don't worry about it).
You could click "Connect" and you would connect to the computer you specified, but I suggest reading more to understand the program better. |
4. General Options
 (click for larger image)
|
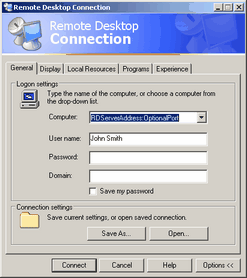
From the startup window click on the "Options >>" button to reveal the general options page.
The general options page allows you to enter the remote desktop server's address, your username, your password and your domain. If you don't know a domain is then you do not worry about it. You can also save the settings you enter into a quick connect shortcut by using the "Save As" button, or edit one you created previously by pressing the "Open" button. However, I highly recommend that you do not save your password into one of those files because anyone that gains access to that file would be able to log into your remote computer. |
5. Display Options
|
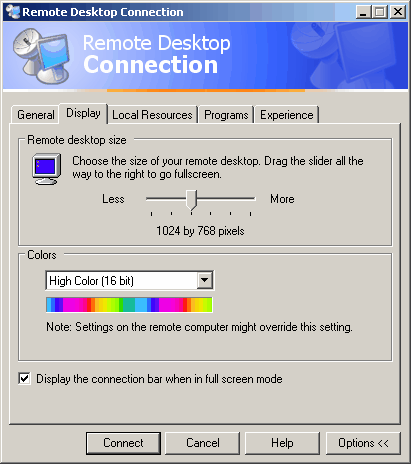
From the expanded "Options >>" menus select the tab for "Display" to open the display options page.
This page allows you to modify the display mode of the Remote Desktop server that you connect to. You can select the resolution you want to use when connected, the color depth and whether or not it shows the connection bar by default. You can normally leave these as default, but you may want to fiddle around with these so that you can see how they work. |
6. Local Resources
(click for larger image)
|
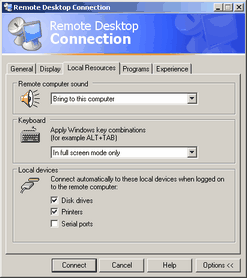
From the expanded "Options >>" menus select the tab for "Local Resources " to open the local resources options page.
This page shows some of the more interesting configuration options.
Remote computer sound: You are given three options here; "Bring to this computer", "Do not play" and "Leave at remote computer". These options should be fairly straightforward and all they do is change the way sound is played. More than likely you will want to use "Bring to this computer" so when the remote computer has sound events that you will hear them through the client, or if you are low on bandwidth then "Do not play" may be preferred.
Keyboard: You are given three options here; "On the local computer", "On the remote computer" and "In full screen mode only". These options change the way the keyboard interacts with the computers, that is to say how keyboard shortcuts such as CTRL-ALT-Delete react. You can choose which computer responds to these keyboard shortcuts, but I find the best is to let the remote computer pick them up "in full screen mode only".
Local devices: You are (again) given three options here; "Disk drivers", "Printers" and "Serial ports". This allows you to choose which devices you want the remote computer to connect when you establish a Remote Desktop connection. The items you select here will be mapped onto the Remote Computer. So, if you select "Disk drives" then the disk drives from your client will appear in the "My Computer" of the server when you connect. In a similar fashion the printers will also be mapped, and this would allow you to print files from the Remote Desktop server to your local printer, which could be exceptionally useful. |
7. Programs Options
 (click for larger image)
|
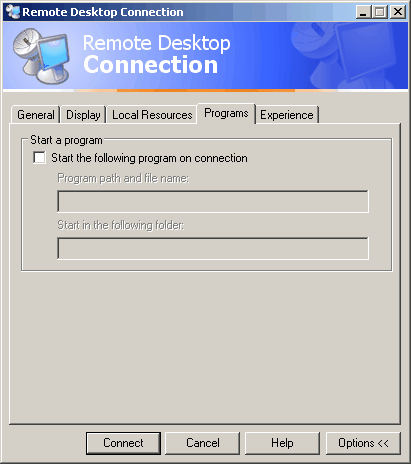
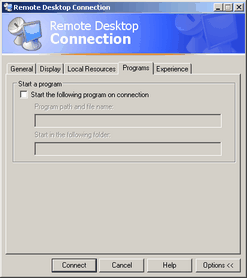
From the expanded "Options >>" menus select the tab for "Programs" to open the programs options page.
This page is fairly simple and it allows you to choose a program to execute on the Remote Desktop server after you have connected successfully to it. I have never used this feature, but I could see how it could be useful for some people out there. |
8. Experience Options
 (click for larger image)
|
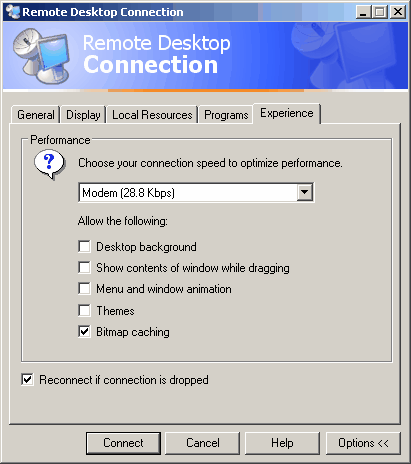
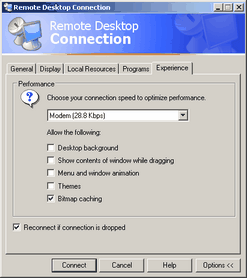
From the expanded "Options >>" menus select the tab for "Experience" to open the experience options page.
The experience options are basically so you can tweak how efficient the connection is. You are given several templates from the drop-down menu, or allowed to mix and match options. The basic idea here is that some options will slow down the connection because you will force greater information exchange, and some options will speed up the connection.
I personally always uncheck everything except for "Bitmap caching", which is the same as selecting the "Modem (28.8 Kbps)" template. I personally do not want themes displayed or other graphic enhancements, but this is a personal choice. However, if you are using this over a dial-up (non-broadband) connection then you will most likely want to do the same as I do. |
9. Connect
|
From any of the Remote Desktop menus click on the "Connect" button to establish a connection with the Remote Desktop server.
|
Return to top.
Client Usage
It should be fairly easy to use the Remote Desktop session. The top of the screen shows the connection tab. You can press the thumbtack to allow the bar to hide, and then you can summon it by holding your mouse cursor at the top-middle of the screen. You can browse the remote computer as if using your local computer. If you are using the remote computer in a windowed (non-maximized resolution) then it will behave just like any other window.
Return to top.
Advanced Usage
Under most circumstances people will use Remote Desktop in its default form, but there are a few changes that you can make to improve it.
Shared Disk Drives
If you checked the "disk drives" option under the "local devices" in step 6 of the client connection section of this guide then the drives of the connecting computer will be mapped onto the remotely controlled computer. This drives are not given letter drive mappings, but rather they are given odd named mappings for some reason of the format "%drive% on %comp%", where %drive% is the drive letter of the local resource and %comp% is the NetBIOS name of the local computer. The really interesting thing here is that the local computer always resolves to the name of TSCLIENT and in fact you can connect to \\TSCLIENT and see any shared resources from that computer. So, you could in theory use a "net use z: \\tsclient\c" or such statement to map drive letters if you find that better.
Using an Alternate Connection Port
If the hosting computer is using an alternate port then you can specify this when you are connecting. Instead of just entering the IP, DNS, or NetBios name into the "Computer:" field when connecting, you can enter a colon and the port to connect to. Such as: 192.168.0.5:3389
Console Connection
If you are connecting to a Windows Server 2003 computer then by default you can have three connections through Remote Desktop to that computer. A connection is considered any user that is actively logged into or left logged into that computer. One of these connections is called the console connection. If you try to connect a third user to a hosting Windows Server 2003 computer then Remote Desktop client will throw an error that too many users are connected. However, if you execute the Remote Desktop client with the /console parameter then it will connect to that server's console port and you can always log in as long as you have administrative privileges. It should be noted that this is called the console connection because it causes Remote Desktop to log into the client console, meaning it is like logging in locally.
Return to top.
|
|