|
|
Remote Desktop Guide: Setup Server < [2/4] >
Table of Contents
Overview
In order to use Remote Desktop you need to designate a computer as the Remote Desktop server. This will be the computer that you will remote control. This computer will need to be running Windows XP Professional or any version of Windows Server 2003. You cannot configure a Windows XP Home computer to be a Remote Desktop server.
Return to top.
Typical Setup Procedure
The first step to protecting your computer is to keep your software up-to-date. This alleviates the problem of being infected through a software vulnerability, but also has the side effects of fleshing out various other bugs and sometimes adds additional features. Most software gets updates either through newer installs or addon patches. Depending on the program you wish to update the procedure will change, so it is a good idea to check the documentation of the program you are installing. However, you shouldn't feel that you have to update everything.
1. Security Update
|
Before you begin changing settings it is very important that your computer is fully patched. So, please begin by visiting [http://update.microsoft.com] before proceeding. This will make sure that once you enable Remote Desktop you are not opening yourself up to known vulnerabilities that could put your computer at risk. |
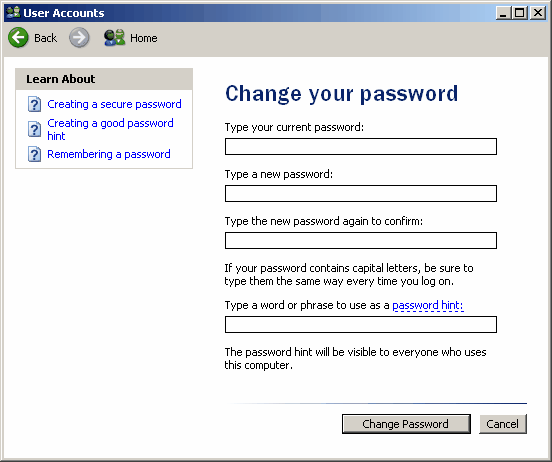
2. Set a Strong Password
(click for larger image)
|
This is a very important step. By enabling Remote Desktop you will be opening a pathway into your computer. The only thing that will stand between your computer and other users is a password. For this reason it is very important that you set a strong password on the accounts that you will later allow access through Remote Desktop. It should be noted that accounts with blank passwords cannot use Remote Desktop, at least not by default. |
3. Enable Remote Desktop
(click for large image)
|
You can enable Remote Desktop by simply accessing the "System Properties" menu. The easiest way to access this is to right click on your "My Computer" icon and select the option for "Properties". It should be noted that your "My Computer" icon may be on your desktop or in your Start Menu. Alternatively, you can access the System Properties menu from the Control Panel by accessing the System icon. If you're asked to choose a category then select "Performance and Maintenance" and then choose the "System" icon. You could also access this menu by holding down the Windows key and then pressing the Pause/Break key.
From the "System" menu select the tab for "Remote". Under the section called "Remote Desktop" tick the checkbox labeled as "Allow users to connect remotely to this computer" and then press the Apply button. |
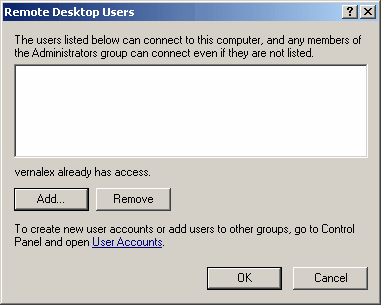
4. Select Remote Users
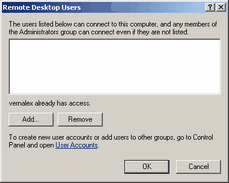
(click for larger image) |
While still under the "Remote" tab of the "System Properties" menu click the button labeled as "Select Remote Users". From within this menu add any users that you want to have access to remote control the computer.
Advanced Note: You can use the Local Security Policy Editor to accomplish this also. This is usually not necessary, but I usually prefer to use this instead. This editor can be found in the Administratrive Tools, or I prefer to click the Start Menu, select Run and type in "secpol.msc" and press the OK button. It is under Security Settings - Local Policies - User Rights Assignments as "Allow logon through Terminal Services". This can also the place to locate it under Group Policy for System Administrators on Active Directory. |
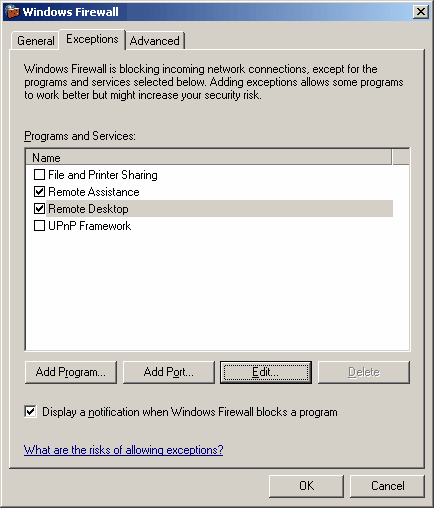
5. Remove Firewall Restrictions
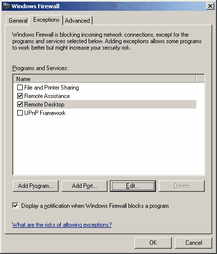
(click for larger image) |
Now that Remote Desktop is enabled you will need to open a pathway through your firewall so that it is accessible from other computers. The easiest way to do this on Windows XP Professional is to click on the text "Windows Firewall" from the "Remote" tab on the "System Properties". However, depending on your version of Windows this may not be possible. The other way is to go to Start Menu, Settings, Network Connections. From there right click on your active network connection and select Properties. Then go to the "Advanced" tab and press the "Settings" button. Then go to the "Exceptions" tab and in the list make sure that the checkbox for "Remote Desktop" is ticked. You can also get to the firewall settings in some versions of Windows from the Control Panel and selecting the option for Network Connections (if asked to pick a category then select "Network and Internet Connections") and then selecting "Properties" on your Internet adapter or by selecting the option for "Windows Firewall" (if asked to pick a category then select "Network and Internet Connections").
If you have a third party firewall then grant TCP access through port 3389. This can be done in any 3rd party firewall program such as ZoneAlarm or Norton Internet Security. |
6. Restart
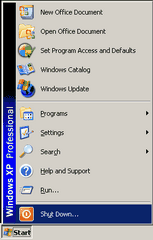
(click for larger image) |
Once you have completed those steps then restart your computer and Remote Desktop should be enabled and ready to use.
You cannot connect to yourself using Remote Desktop since it does not allow loopback connections. You would not want to do this anyhow though since it would cause very strange behavior. Instead find another computer to test it from. |
Return to top.
Advanced Setup
Under most circumstances people will use Remote Desktop in its default form, but there are a few changes that you can make to improve it.
Change the Default Port
One of the best alterations you can make is to change the default TCP port that Remote Desktop uses. The default port is 3389, and this is quite well known. So, when you open that port up to the Internet then it is quite common for others to scan your computer for this port, and if they detect it they may try breaking into your computer. Therefore, I highly recommend that you change this to something else as it will decrease the chances of being hacked, or better yet it will decrease the chance of hackers finding the access point at all.
The port number used is buried within the system registry. If you are unfamilar with the registry then you could read the [registry section] of my [components guide] to better understand it. The port is located in HKLM\SYSTEM\CurrentControlSet\Control\Terminal Server\WinStations\RDP-TCP under the DWORD value of PortNumber. By default that value should already exist and it should be set to 3389 (0D3D in hexadecimal). You can change this to any unused port number, which are decimal numbers between 1 and 65535 (0001 to FFFF in hex). I would recommend picking a port in the tens of thousands though as those are much less likely to be scanned, but anything over 2000 is pretty good. Try not to pick commonly scanned ports or ports with patterns; like 65535 is bad, 55555 is bad, etc..
If you change the port make sure to read the client section of the guide for how to connect to an alternate port.
Return to top.
|
|